
Adobe Lightroom has established itself as a leading photo editing software, widely utilized by both professional and amateur photographers. This powerful tool offers an array of functionalities, enabling users to enhance their images with precision and creativity. One of the standout features of Lightroom is its extensive selection of filters, which can dramatically influence the mood and tone of a photograph.
Introduction to Lightroom Filters
Lightroom filter edited photos as a vital component for photographers aiming to refine their images. They allow for adjustments that can range from subtle enhancements to bold transformations, often completely altering the visual aesthetic of a photograph. Whether it’s increasing contrast to create a more dynamic image, adjusting colors to evoke specific emotions, or applying a soft focus to create an ethereal view, Lightroom filters provide the essential tools needed to achieve the desired effect. By utilizing these filters, photographers can tell a more compelling story through their imagery.
The flexibility of Lightroom’s filters also lies in their customizability. Users can fine-tune filter settings to better suit their photographic style and vision. With adjustments available for exposure, brightness, shadows, and more, Lightroom empowers photographers to make informed decisions that elevate their work. Additionally, the interface is designed for user-friendliness, making it accessible for photographers at all skill levels to apply filters effectively.
Furthermore, the integration of filters enhances the visual storytelling aspect of photography. By carefully selecting and applying filters, photographers can evoke certain emotions in the viewer, create a sense of place, or establish a particular time period. This strategic application of filters can lead to powerful and memorable images that resonate with audiences, showcasing the true potential of Lightroom as an indispensable editing tool.
Understanding Different Types of Filters
Lightroom offers a variety of filters that significantly enhance the quality of photographs, allowing users to adjust key elements such as brightness, contrast, saturation, and color grading. Understanding the different types of filters available in Lightroom is essential for photographers aiming to elevate their editing process.
The first category is Presets, which are pre-defined adjustments that can be applied to an image with a single click. These presets save time by providing a base edit that can be further fine-tuned. Photographers can create their own presets or utilize a wide array of community-generated options, which can dramatically influence an image’s appearance. Whether it’s a vintage look or a modern aesthetic, presets serve as a foundation to efficiently transform photos.
Basic Adjustments constitute another fundamental aspect of Lightroom filters. This includes a range of settings such as exposure, contrast, highlights, shadows, clarity, and white balance. Each adjustment serves a specific purpose; for instance, increasing exposure can brighten a dark image, while adjusting contrast brings out the details between light and dark areas. Mastery of these basic settings allows photographers to achieve a well-balanced image tailored to their vision.
Creative Filters introduce artistic adjustments to an image, enabling users to infuse their photographs with unique styles. These may include color grading to modify the mood of the photo or applying effects that create a more dynamic on-screen presence. With creative filters, users can experiment with various looks that align with their personal style and intended message.
Lastly, Local Adjustments allow for selective editing. Features such as the adjustment brush and graduated filters enable photographers to make specific edits to targeted areas within the photo. This is particularly useful for enhancing skies, improving skin tones, or refining elements without affecting the entire image. Overall, understanding these diverse types of filters in Lightroom is integral to harnessing the full potential of photography editing.
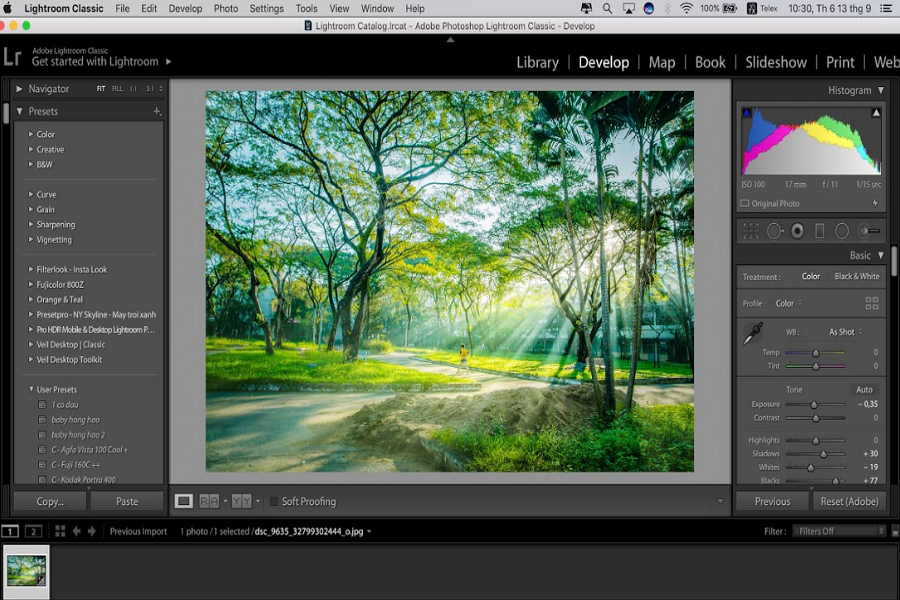
How to Apply Filters in Lightroom
Applying filters in Adobe Lightroom can significantly enhance the quality of your photographs, enabling you to express your artistic vision more effectively. To begin this process, the first step is to import your desired images into Lightroom. Open the software and navigate to the Library module, where you can click on the “Import” button. Here, you can select your photos from your computer or external device. By organizing your images in folders, you will streamline this process and easily locate them for future editing.
Once your images are imported, proceed to the Develop module. This is where you will find the filter options available to you. Lightroom provides both global adjustments that affect the entire image and local adjustments that let you apply filters to specific areas. To apply a general filter, locate the “Basic” panel on the right side of the screen. Here, you can begin adjusting sliders like Exposure, Contrast, and Saturation to create the desired effect.
For more tailored adjustments, consider using the Graduated Filter or Radial Filter tools, both accessible from the toolbar above the image. After selecting the desired filter, click and drag across your photo to apply the filter to a specific area. You can adjust the amount of the effect just as you did with the global settings. Remember to experiment with these adjustments to better understand how each filter impacts your image.
Finally, once you are satisfied with your edits, it is essential to save the changes. Click on the “Export” button in the Library module, where you can choose your export settings. This step allows you to save your edited images in various formats and sizes suitable for sharing or printing. Leveraging the power of filters in Lightroom will elevate your photography and provide a polished finish to your work.
Tips for Choosing the Right Filters
When it comes to enhancing your photography, using filters in Lightroom can significantly elevate your images. However, selecting the appropriate filters for your specific photography style is crucial to achieving the desired outcome. Begin by identifying the genre of your photography. Different styles, such as portrait, landscape, or street photography, have unique characteristics and aesthetic requirements. For example, if you are editing a landscape photograph, consider using filters that enhance vibrancy and contrast without overwhelming the natural colors. In contrast, portrait photography often benefits from softening filters that enhance skin tones and provide a more flattering appearance.
Related Articles: Fashion photo editing services
One of the key strategies in achieving a natural look with filters is to apply them sparingly. Begin by applying subtle adjustments to your images and gradually increase the intensity until you reach an optimal level. This approach helps in maintaining the authenticity of the photograph while still benefiting from the enhancements that filters offer. Additionally, be wary of common pitfalls, such as over-editing; a photograph that is excessively filtered can appear artificial and reduce its overall visual impact. To prevent this, you may want to consider using a layer of gentle adjustment instead of heavy filters, allowing for a more balanced final image.
Furthermore, don’t hesitate to experiment with different filters during the editing process. The versatility of Lightroom allows you to try a variety of styles and combinations. Use the white balance adjustment and tone curve tools in conjunction with filters to fine-tune your photos more effectively. Always remember to review your edits on different screens to appreciate how the adjustments translate across various displays. By considering these factors, you can successfully choose and apply filters in a way that enhances your photography while preserving its natural beauty.